Showing posts with label mixed media. Show all posts

2022/01/24

123... Breathe - StencilGirl Collaboration post


Hi everyone, its been a while since I've posted here. I've been hanging out on Instagram mostly these past years. But I do miss sharing some stuff here now and then. What better way is there to start off blogging again than to reveal the collaboration piece I did with StencilGirl columnist Tina Walker, which is all about self portraits.

Collab participants were challenged to create a self portrait, using any mediums, design styles, or techniques of choice, but with the caveat, to create a portrait as they see themselves. This is what I made for the challenge using a whole heap of my fave StencilGirl Stencils and a lot of different media. 


I started with a face stamp on watercolor paper. and wanted to create an underwater mermaid scene. This piece is all about releasing the inner mermaid and to dive deep and just breathe through it. 


I worked with a lot of layers of acrylic paint over top of the watercolor, but made sure there were transparent layers for depth, and also added some interference colors for sparkle effect. 


These are the materials I used, decoarts and dina wakely acrylics.

And all the stencils I used

Mermaids

Past, Present, Future 

123 

ATC mix up Apter

I really enjoyed making this piece for this collaboration project. Please have a look at all the wonderful works by other talented artists in the blogpost HERE 

Thank you for stopping by and have a wonderful week.

xo Cheetarah

2020/01/31

Imagination vs Knowledge

A little  while back I had this a guest post on the StencilGirl blog and wanted to share this here as well.
For a while now I have been experimenting with watercolors and creating patterns with stencils. And today I would like to share a project which was a result of the experimentation which is an interactive watercolor painting.


The base is a large piece of watercolor paper by Viking 1914. I used the landscape pad which is 15x42 cm, 310gms in weight & 50% cotton.  The paper was glued on all sides to the block so the paper doesn't warp with using a lot of water. Great quality paper and having it taped down is very important for a successful watercolor painting. The paints I used are from Sennelier, a french professional watercolor brand which I have filled the wells of my Koi travel pocket box with. The brush I am using is a large quill brush and I made sure to have 2 water cups, one for cleaning and one for mixing. I traced the face silhouette from Seth Apter's Borderliners Large stencil (a dec. 2017 StencilGirl® StencilClub stencil release) on the right hand side and then went to work to create a galaxy color composition over the entire page.


When working with watercolors, timing is key, so I do not have many mid process pictures. I've worked on these layers for about 30-45 minutes, adding color and letting them blend out in a process you have to practice with patience and appropriate speed. I have watched many tutorials on YouTube on how to create galaxy watercolor paintings and this is a very simple & effective tutorial: https://youtu.be/ZFVLLjS912E and I have applied the same technique in my painting.


After the piece was thoroughly dry I took a medium damp cloth and created texture by removing some color over the dotted pattern in the large stencil. I only did this on the aria's opposite the silhouette.


I made sure the silhouette was standing out by using contrasting colors and keeping the edge of the line as sharp as possible. Darkened the face up more and used an opaque white ink for the starker contrast. Now to add more patterns in the piece.


With a black paint pen I have traced the large bubbles which were in the same large stencil as the face, then colored them in with the opaque white acrylic paint. I also splattered some of the white paint over the painting. The added in the quote "Imagination is more important than Knowledge" with the black paint liner. The quote by Einstein is found on the Pen & Ink Large stencil by Lesley Riley.


After I was done with the painting I took it off the watercolor block I folded the painting because I planned to make an interactive piece out of it.

I took a semi transparent acrylic dark blue and a semi opaque lighter blue paint and sponged it through the large numbers of the Borderliners stencils. Then traced the numbers in with a black paint liner. I cut out the silhouette face so it folded over the quote. I traced the quote lines with a wite paint liner for some contrast. 
This is what it looks like when you open up the side of the face. With an exacto knife I cut open a portion of the silhouette line, folded in half to glue it in place like this. Added the same numbers border with a mix of the paint and traced it with a white paint liner. With this last detail added I called the interactive painting done. Here are some close up pictures. 


I hope you enjoyed seeing how this interactive painting came together and that you might try making something like this yourself. Have a lovely day.

xo Cheetarah

2019/10/04

Art Journal: Perspective of time - VLVS!


Hey everyone, it's been a while I shared something on the blog. Life has been super busy. Finally had some time to art journal again and made the above spread for a VLVS! blogpost. Head on over to see how I made it and what I used. 

Thank you for stopping by and have a lovely weekend. 


2018/12/15

Celebrate the season - AALL & Create


It's halfway through december and holiday preparations are in full swing. I wanted to show that you can create a card for the holidays without needing explicit themed stamps and I am using wonderful products from AALL & Create for this project. 

It's all about color and perception.  Adding the green and red colors through the lotz of dotz #39 stencil in the background makes it festive for the season. 


The circular patterns on stamp set 120 are really fun to use on their own and I embossed them with copper, cut them out and colored them with very bright yellow gold watercolors. I enhanced the edges with a metallic wink of luna marker in copper & extra accents with a white gel pen.

I then adhered them to the card with pop up dots. Stamping the flower stem of set 123 makes them look like lovely hanging ornaments.
 
I added some accents with ranger liquid pearls and the sentiment celebrate is a die cut from Tim Holtz Alterations. 


I'm very pleased how the finished card looks. 

Products used: 


You can find the stockist list at the boutique HERE

Thanks for stopping by and wishing you a wonderful festive season. 


2018/12/08

Art Journal: Blossom - AALL & Create


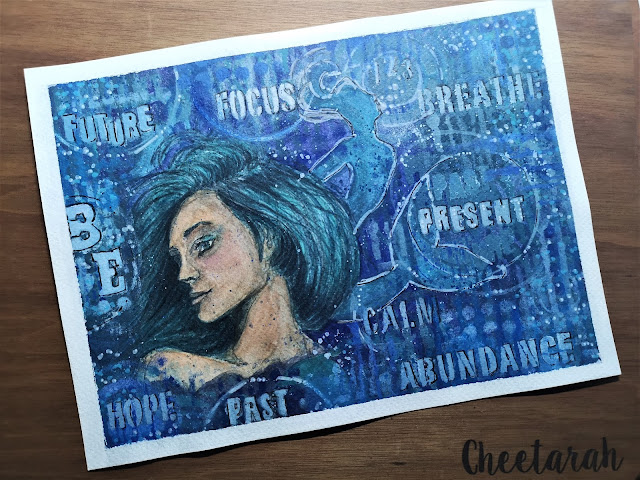
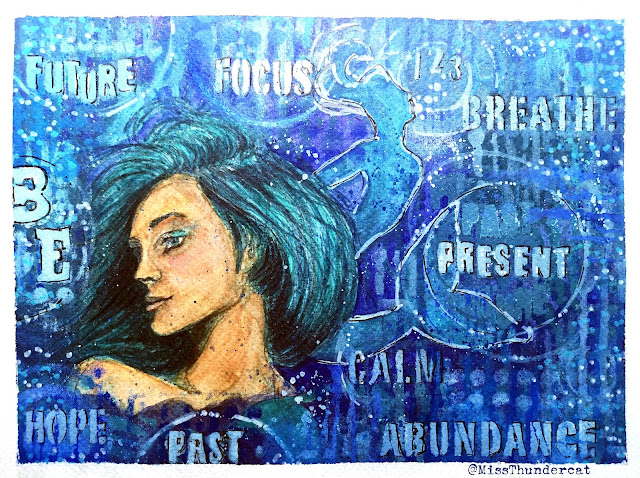
It's saturday and that means I have another project to share with you using wonderful AALL & Create products. This time I made this art journal page using a lot of texture and elements to create a deep rich mixed media page. let me tell you how I made it. 


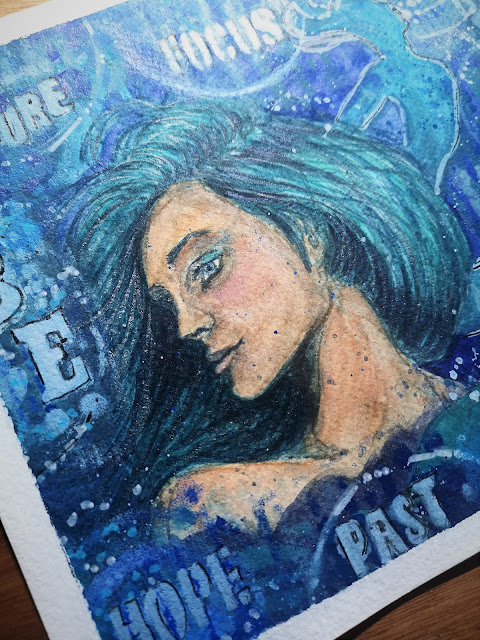
I started off by stamping this gorgeous girl image from set 127 by Katy Paltridge on a piece of book paper that had excess paint on. I gessoed the text part & stamped with Versafine black to get a crisp imprint. 

Here I have stamped the flower multiple times from set 123 by Tracy Evans on a piece of gelli printed paper and cut then out to include in the art journal at a later point. First I had to incorporate the stamped image into the art journal. 

I have glued the book page and several text and music clippings to my art journal page to create more texture and layers. 

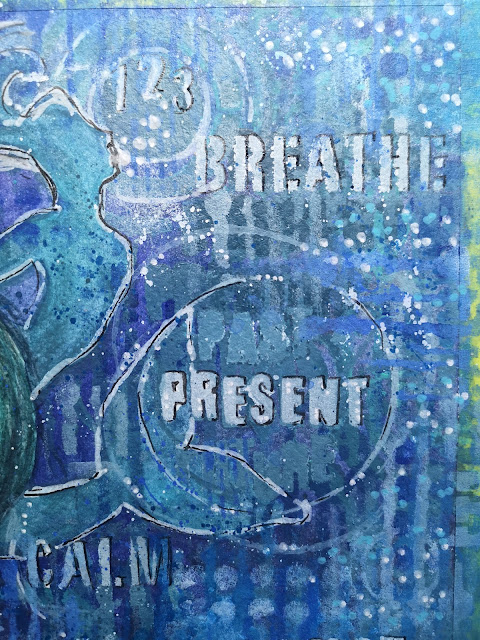
Then I added gesso, white and gold over the collaged elements and stamped bits of set 120 with Staz on stone gray over the page for some cohesion. 

To add more interest to the page I took stencil 41 Mickle Muckle and added white crackle paste through it. Under the layers I also glued on some different fiber fabrics to add to the deverse texture. I had let this dry really well before applying color on it. 

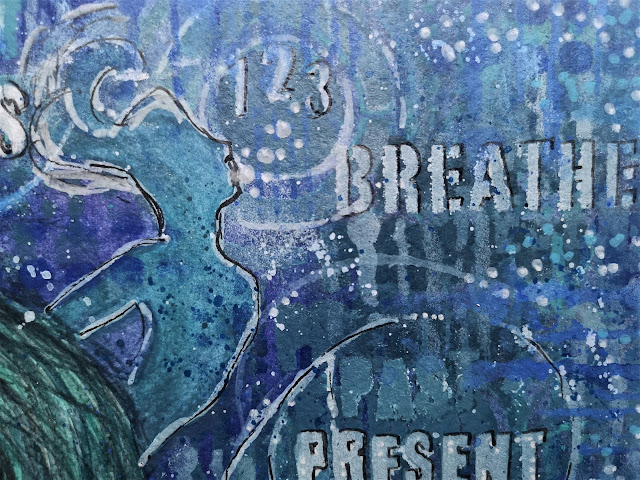
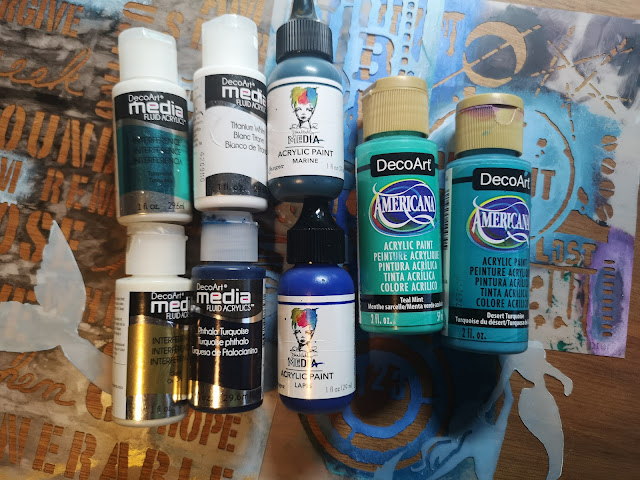
So the next step was applying color and I used a variety of mediums for that: Lindy's Sprays, finnabair metallic paints, perfect pearl metallics for the "Frame" and the girl's face is accentuated with watercolors. 

Because the book page was treated with gesso, it took the watercolor really well. I just applied bits of color to the face for accents and shadows, and made sure you could see the book text shine through it still. I really love how dreamy she looks here. 

And now onto adding the flower elements that covers the open spot on the side. Glued them in the middle onto the page so the stand out a little. The color in the flowers also come back in the background of the page. I also stamped a bit of texture and text in the background to have more interest. And decided the bottom part needed to stand out a bit more too. 

So stamped and cut out the word bloom from set 120 and another flower to "ground" it. 
As a last step I added some white splatters all over the page and created a scribble border with acrylic paint marker. 

I absolutely LOVE how this journal page turned out and glad the idea I had in my head worked out like it did :) This page reminds me a lot of sping and it's my second fave season, or well it's a tie actually with autumn. I'm linking this to my friends's challenge Art Journal Journey with the theme of My fave season.  

The products I used: 
41.jpg 
Stamps-Insert-10.jpg


You can find the stockists at their Boutique.

Thank you so much for stopping by and have a wonderful weekend!


2018/12/01

From the bottom of my heart - AALL & Create


Hi all, thank you for stopping by my blog today. I have a card made with a gorgeous stamp set from AALL & Create which I wanted to share with you today. This gorgeous flowers blooming from the heart is a stamp from set #138 by Olga Heldwein and I used an emboss resist technique. 

I started off by stamping the image with versamark on watercolor paper and I have embossed is with white embossing powder. 


The I sprinkled some pigment powder - color Kathrynwheel by Nuvo - and spritzed water over it. You can see the gorgeous color appear and notice how the embossed aria's resist the pigment. 
I added more pigment until I was satisfied with the color and dried with my heat tool, being careful not to over heat the embossed part. 

This is the base of my card, which I then trimmed & matted onto black card stock. I love how you can see the color nuances of the powders in the flowers. 


Before matting it onto black cardstock I took black soot distress oxide and a blending tool and went around the edges. Then splattered some water and copper distress stain over it. I also enhanced a bit of the flower pattern with a Tombow marker in Merlot to give the image a bit of shading. All the edges are gilded with the bronze distress stain and the sentiment is also from the same set & I white embossed it on black cardstock & adhered with foam tape.  


It's a card you can sent to someone to express your heartfelt emotions; to say thanks, to say that you care, to let them know they are loved... all from the bottom of your heart, which then blooms expressively and vibrantly with love.
Hope you liked seeing this project with gorgeous AALL & Create stamps. Please visit their boutique to shop online or to see where you can get these stamps from their many stockists world wide. 

Products used:
 
Thanks for stopping by and have an awesome weekend!